Quick Answer: How do you use an AI logo in Cricut Design Space?
Do not upload the raw AI image directly. First, use a free background remover tool to make the logo transparent. Second, upload the transparent PNG to a free vectorizer tool (like Adobe Express SVG Converter or Vectorizer.ai) to turn the pixels into cuttable paths. Finally, upload the resulting SVG file into Cricut Design Space.
If you have used Midjourney, DALL-E, or LogoAI to create a logo for your small business, you probably downloaded a stunning image. But the moment you uploaded it into Cricut Design Space to cut a vinyl decal or a t-shirt transfer, it turned into a messy, pixelated block.
The blade doesn’t know where to cut, the background is in the way, and the text looks melted.
This happens because AI tools output Raster images, but your Cricut needs a Vector image. In this guide, we will walk you through the exact, 100% free workflow to convert your AI-generated logo into a perfect SVG cut file.
The Problem: Raster vs. Vector
Before we fix the logo, you need to understand why Cricut is rejecting it.
- Raster Images (JPG/PNG): This is what AI gives you. The image is made of thousands of tiny colored squares (pixels). A Cricut blade cannot read pixels; it just sees a giant square photograph.
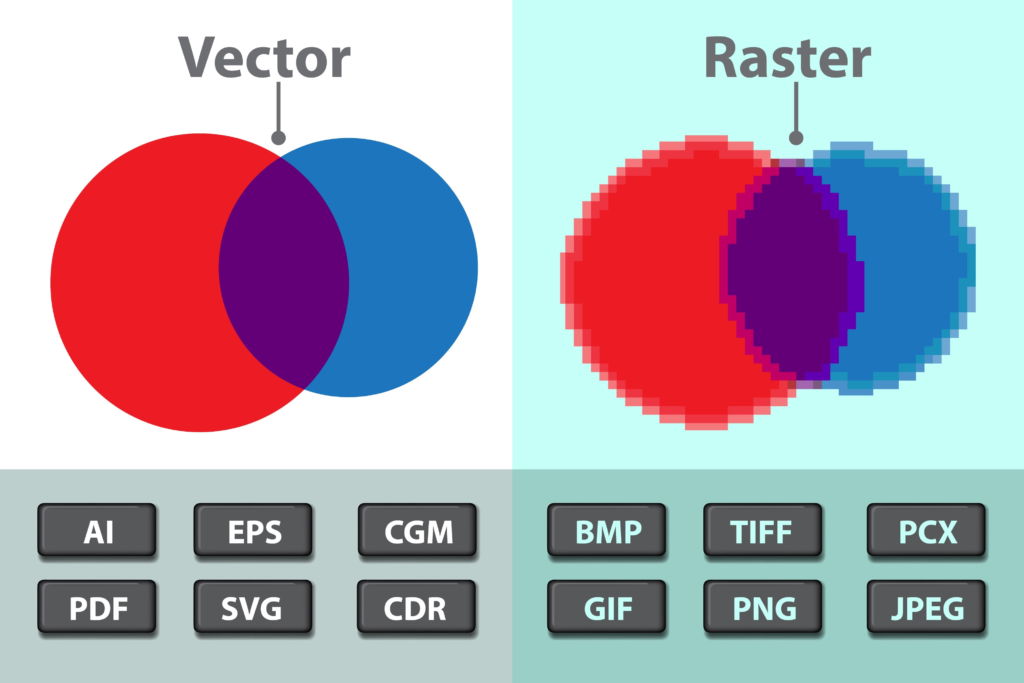
- Vector Images (SVG): This is what Cricut needs. SVGs are built using mathematical formulas that create paths and lines. A Cricut blade simply follows these invisible lines to cut your vinyl perfectly.
To get your logo onto a t-shirt, we have to translate the pixels into paths.
Step 1: Remove the Background
AI generators almost always add a background color—even if it’s just plain white. If you convert the image to an SVG with the white background attached, your Cricut will just cut out a giant square around your logo.
- Go to a free background removal tool like remove.bg.
- Upload your AI logo.
- The tool will automatically strip away the background, leaving a checkerboard pattern behind your design.
- Download the new file (it will save as a transparent PNG).
Step 2: Convert to SVG (Vectorizing)
Now you have a transparent logo, but it is still made of pixels. We need to trace those pixels into clean, scalable lines.
- Go to a free vectorizing tool. Adobe Express Free SVG Converter or Vectorizer.ai are currently the best options for handling complex AI art.
- Upload your transparent PNG.
- The software will automatically trace the edges of your design.
- Click “Download” and ensure the file format is set to SVG..
If you also work with a CNC router or laser cutter alongside your Cricut, the vectorization workflow is nearly identical — we cover the full machine-ready file prep in our guide on how to vectorize AI logos for CNC.
Step 3: Fix the AI Text (Crucial Step)
AI is notoriously bad at spelling. Even if the letters look correct, the AI often generates text with jagged, uneven edges that look terrible when cut out of vinyl.
The Pro-Tip Workflow: If your logo includes your business name, do not vectorize the AI text. Instead, use a basic eraser tool (available in Canva or your phone’s photo editor) to completely erase the melted text from your transparent PNG in Step 1.
Convert only the icon or symbol to an SVG. Once you import the symbol into Cricut Design Space, use Cricut’s native text tool to type your business name using a clean, cut-ready system font.
Step 4: Import into Cricut Design Space
You are now ready to prep the file for your machine.
- Open Cricut Design Space and start a New Project.
- Click Upload on the left-hand toolbar, then Upload Image.
- Select the SVG file you downloaded in Step 2.
- You will notice that the standard “Background Eraser” screen is completely bypassed. This is because according to official Cricut guidelines, SVG files are already pre-separated into layers.
- Click Add to Canvas.
Video Guide: Cleaning Up AI Layers in Cricut
Sometimes, AI generators create images with too many colors or messy overlapping shapes. Even after you convert it to an SVG, the layers might look chaotic when you upload them.
If your converted SVG has too many messy cut paths, watch this excellent visual walkthrough.
Key takeaways from the video:
- Free Conversion: See a live demonstration of taking an AI image (like the ghost generated in the video) and running it through a free web converter [03:04].
- Fixing Muddy Layers: Learn why you shouldn’t just upload raw AI files directly into Cricut, as they create “muddy” paths that the blade will ruin.
- Cricut Design Space Cleanup: Jump straight to [07:54] to see the exact steps for using the “Contour,” “Weld,” and “Slice” tools inside Cricut Design Space to delete unwanted background artifacts and combine your AI logo into perfect, solid vinyl layers.
Look at the layers panel on the right side of your screen. Instead of one flat image, your logo is now separated into multiple “Basic Cut” layers based on color. You can now resize the logo infinitely without losing quality, change the vinyl colors, and send it to your machine for a flawless cut.
Leave a Comment